Financials Accelerated Session 2
| Info | ||
|---|---|---|
| ||
Information will be needed from your Executive sponsor, and may be needed from your Accountant for the configuration settings chosen in this session. |
| Info | ||
|---|---|---|
| ||
|
Adding Standard Segments
Here is an overview of the segments we will build and what they will be used for:
Dimension | Purpose | Uses | Example Values | ||||
|---|---|---|---|---|---|---|---|
Restriction | Determines allowed use of funds | Class | Unrestricted, Temporarily Restricted, Permanently Restricted | ||||
Function | For expenses, indicates which function in the organization spent the funds. For income, indicates who earned the funds or what they were restricted for. | Department | General Administration, Program Services, Fundraising | ||||
Location | Represents the locations of your organization | Location | Chicago, San Francisco | Fund/Program | Track the Fund/Program to which the revenue is restricted | Custom Segment | Program A, Program B, Program C|
| Time Restriction | Specifies year restriction on use of funds | Custom Segment | 2016, 2017, 2018 | ||||
Grant | Specifies each Grant from a Funder | Custom Segment | Grant A, Grant B | ||||
Revenue Type | Groups different income into streams | Custom Segment | Contributions, Event revenue, Fee for service, Membership, Sale of goods | ||||
Revenue Subtype | Refines list of Revenue Type | Custom Segment | Cash Donation, Event Donation, Grant, Individual Membership, Program Service |
Function
In Session 1 in the Renaming Records topic, we renamed the Department dimension to Function. NOTE: you may also consider refining the options below to match your org structure. However, we recommend keeping the parent level set at Fundraising, General Administrative and Program Service to match 990 reporting. You may also add another parent level for Sales.
To create Function and Sub-Function records, go to:
Setup > Company > Function > New
Enter “Fundraising” in the name field
Hover over the down-arrow on the blue Save button to show the Save and New option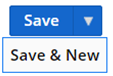
- Click Save & New
- Enter “Special Events” in the Name field
- Select Fundraising from the Subfunction of dropdown
- Click Save & New
Repeat these steps to add the remaining Function and Sub-Function values, replacing the with your own.
- Fundraising
- Special Events
- Professional Fundraising Fees
- General Administrative
- Executive
- Information Technology
- Human Resources
- Legal
- Program Service
- Program A
- Activity 1
- Activity 2
- Activity 3
- Program B
- Activity 4
- Activity 5
- Program C
- Activity 6
- Program A
Restriction
In the renaming records section, we renamed the “Class” dimension as “Restriction.” We would recommend minimizing the entries in this segment to allow simple views of balance sheets, further refinement of Restriction will come from the Function (renamed from Dept).
To create a Restriction, go to:
Setup > Company > Restriction > New
- Enter “Temporarily Restricted Revenue” in the Name field
- Hover over the down-arrow on the blue Save button to show the Save & New option
- Click Save & New
Repeat these steps to add the remaining Restrictions:
- Unrestricted Revenue
- Temporarily Restricted Revenue (completed above)
- Permanently Restricted Revenue (optional, typically used for endowments)
Locations
Location is the third dimension available for tracking income and expenses and categorizing entities such as vendors, customers and employees. To create a new Location, go to:
Setup > Company > Locations > New
- Enter “North America” in the Name field
- Save and New
- Enter your Primary Location in the Name field
- Choose “North America” from the Sublocations of field
- Click Save
NetSuite.org recommends the following structure for Locations. If your organization has multiple locations, continue entering them using the following structure as appropriate:
- North America
- California
- Texas
- Latin America
- Europe
- Africa
- Congo
- South Africa
- Senegal
- Asia
Custom Segments
NetSuite now enables the use of “Custom Segments” to further classify and report financial data. For our nonprofit grantees, we will add the following custom segments:
- Grant – tracks income and expenses by Grant
- Revenue Type – used to track different revenue streams
- Revenue Subtype - Further specifies the different revenue streams
- Time Restriction – used to track actual income and expenses by use year
Creating Custom Segments
We will create the Grant Segment with the following structure, you will need to substitute in your values.
- Grant A
- Grant B
- Grant C
To create the Grant custom segment, go to:
- Customization > Lists, Records and Fields > Custom Segments > New
- In the Label field enter, Grant
- Check the GL Impact box
- On the Values tab, enter the value for your organization’s respective Grants
- Grant A
- Grant B
- Grant C
- On the sub-tab Application & Sourcing
- Check the following values on each tab:
- Do NOT check any of the boxes on the Transactions tab, we will use the Transaction Columns to allow us to set these at the item level.
- On the Transaction Columns tab, Mark all of the boxes for Application and then mark all under record type
- On the Entities tab, check the box for Job (Project)
- On the CRM tab- leave blank
- On the Items tab, click Mark All
- On the Other Record Types tab, check the box for Allocation Schedule Destination Line, Allocation Schedule Source Line, Budget Import and Expense Category
- Check the following values on each tab:
 Additional Custom Segments
Repeat the steps in the Creating Custom Segments section above to create the following custom Segments and values:
Revenue Type:
- Customization > Lists, Records and Fields > Custom Segments > New
- In the Label field enter, Revenue Type
- Check the GL Impact box
- On the Values tab, enter the value for your organization’s respective Revenue Types (we suggest sticking with these values, they are in line with standard reporting needs):
- Contributions
- Event revenue
- Fee for service
- Membership
- Sale of goods
- On the sub-tab Application & Sourcing
- Check the following values on each tab:
- Do NOT check any of the boxes on the Transactions tab, we will use the Transaction Columns to allow us to set these at the item level.
- On the Transaction Columns tab, Mark all of the boxes for Application and then mark all under record type
- On the Entities tab- leave blank
- On the CRM tab- leave blank
- On the Items tab, click Mark All
- On the Other Record Types tab, check the box for Budget Import and Expense Category
- Check the following values on each tab:
Revenue Subtype:
- Customization > Lists, Records and Fields > Custom Segments > New
- In the Label field, enter Revenue Subtype
- Check the GL Impact box
- The Revenue Subtype segment should be filtered by the Revenue segment. To establish the filter, do the following:
- Select the Revenue Type from the Filtered by box
- Enter the following Values (you will need to substitute in your values, these are just examples):
- Cash Donation, then click Set Filter button and select Contributions
- Recurring Donation, then click Set Filter button and select Contributions
- Gift in Kind, then click Set Filter button and select Contributions
- Stock Gift, then click Set Filter button and select Contributions
- Pledge Payment, then click Set Filter button and select Contributions
- Grant Payment, then click Set Filter button and select Contributions
- Event Donation, then click Set Filter button and select Contributions
- Government Services, then click Set Filter button and select Fee for Service
- Program Service, then click Set Filter button and select Fee for Service
- Individual Membership, then click Set Filter button and select Membership
- Corporate Membership, then click Set Filter button and select Membership
- Ticket Sale, then click Set Filter button and select Event Revenue
- Tribute Gift, then click Set Filter button and select Contributions
- Matching Gift, then click Set Filter button and select Contributions
- Pledge, then click Set Filter button and select Contributions
- Grant, then click Set Filter button and select Contributions
- Merchandise, then click Set Filter button and select Sale of Goods
- On the sub-tab Application & Sourcing
- Check the following values on each tab:
- Do NOT check any of the boxes on the Transactions tab, we will use the Transaction Columns to allow us to set these at the item level.
- On the Transaction Columns tab, Mark all of the boxes for Application and then mark all under record type
- On the Entities tab- leave blank
- On the CRM tab- leave blank
- On the Items tab, click Mark All
- On the Other Record Types tab, check the box for Budget Import and Expense Category
- Check the following values on each tab:
Time Restriction:
- Customization > Lists, Records and Fields > Custom Segments > New
- In the Label field enter, Time Restriction
- Check the GL Impact box
- On the Values tab, enter the value for your organization’s respective Time Restrictions:
- 2015
- 2016
- 2017
- 2018
- 2019
- 2020
- 2021
- On the sub-tab Application & Sourcing
- Check the following values on each tab:
- Do NOT check any of the boxes on the Transactions tab, we will use the Transaction Columns to allow us to set these at the item level.
- On the Transaction Columns tab, Mark all of the boxes for Application and then mark all under record type
- On the Entities tab- leave blank
- On the CRM tab- leave blank
- On the Items tab, click Mark All
- On the Other Record Types tab, check the box for Budget Import and Expense Category
- Check the following values on each tab:
Accounting
This menu introduces several settings and options related to Accounting features. Many of the settings here aren’t required for basic accounting—they’re used for more advanced financial functions. This section describes only those basic required accounting setting.
Accounting Lists
Accounting Lists in NetSuite are essentially values that populate dropdowns throughout the system. The values can be changed and customized to suit your specific business requirements. The types of Accounting Lists include:
|
|
In order to properly account for payments received by cash or check, the Payment Methods must be set to Undeposited Funds.
To set the Payment Methods to Undeposited Funds, go to:
Setup > Accounting > Accounting Lists
- Click Edit next to Check
- On the Account tab, select Group With Undeposited Funds
- Repeat this step for Cash payments
When we import data later, the Terms imported with Customer and Vendor records must already exist in NetSuite, and the verbiage must be identical in the Import file and NetSuite. If the import file has a term called “Net 30 Terms” and the version in NetSuite is called “Net 30,” the import will fail. As with any import where the value is already in NetSuite, the terminology must be exact.
To ensure that the Terms in NetSuite match the Terms you offer and that you may be importing later, go to:
Setup > Accounting > Accounting Lists
- On the filter bar directly above the list, choose “Term” from the Type dropdown
- Review the names of the Terms included in NetSuite
- Review the name of the Terms used in QuickBooks
- Click Edit next to any of the preset terms you would like to change
- Make your changes and Save
To create new Terms in NetSuite, go to:
Setup > Company > Accounting Lists
- From the Type dropdown choose Term
- Click the New button
- Complete the form and Save.
Expense Categories
Expense categories are not required to set up financials, but they can be helpful later. Expense categories are simple terms used on expense reports and bills that tie to the chart of accounts.
Accounting Preferences
| Note | ||
|---|---|---|
| ||
|
General Tab
- Use Account Numbers – Check this box. Account numbers are recommended for improved management of Accounts and Reporting.
- Expand Accounting Lists – Check this box. By default, NetSuite displays only Income and Expense Accounts in Item or Transaction dropdowns. In order to post income and expenses to balance sheet accounts such as Unrestricted Net Assets or Deferred Liability, this box must be checked.
- Cash Basis Reporting – Do not check this box. The self-implementation guide was written for organizations that are accrual-based.
The remaining settings are typically assigned or chosen based on organizational policy.
Items/Transactions Tab
The Duplicate Number Warning checkbox found at the bottom of this screen is an important feature that is sometimes disabled because of electronic payments made to multiple vendors. If your accounts payable department uses the same payment ID or confirmation number for multiple vendors, they may receive frequent warnings that the number is already in use. This box will disable that feature.
The Duplicate Number Warning feature may also be disabled on a per-user basis. Users may change this preference by going to:
Home > Set Preferences > Transactions
- Uncheck Duplicate Warnings box
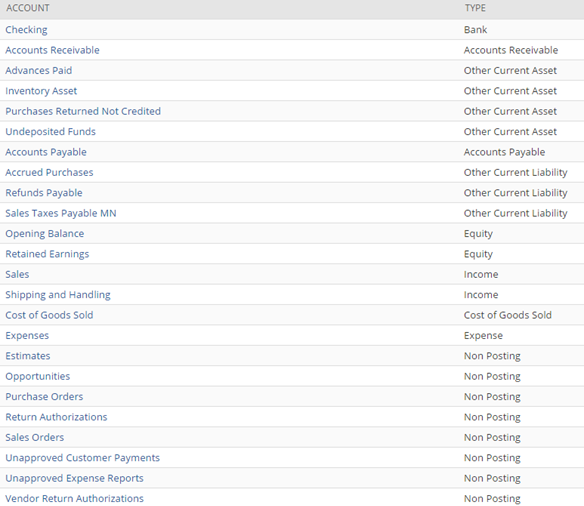
Chart of Accounts
The screenshot below lists the accounts and account types that are included with NetSuite when it is provisioned. Some accounts will vary based on the state or country in which your organization is based.
| Info |
|---|
|
Integrating the Unified Chart of Accounts
During the process of setting up the Chart of Accounts, you will import a group of accounts that are based on the Unified Chart of Accounts (UCOA). [1]The Unified Chart of Accounts for nonprofit organizations is a chart of accounts freely available to any nonprofit organization, accountant, or consultant. The system is designed so that nonprofits can quickly and reliably translate their financial statements into the categories required by the IRS Form 990, the federal Office of Management and Budget, and into other standard reporting formats. In order to more easily take advantage of future Netsuite nonprofit product enhancements, we recommend you use the UCOA Chart of Accounts format.
| Info | ||
|---|---|---|
| ||
The general process for setting up your Chart of Accounts in NetSuite is as follows:
- Ensure the account numbering feature is enabled
- See the section above called Accounting : Accounting Preference
- Rename existing accounts
- Import the UCOA accounts
- Export your chart of accounts
- Integrate your accounts in the UCOA account structure
- Import the Excel CSV file into NetSuite
During this session, we will rename the existing accounts. Following session 2, you will prepare your chart of account import files and import them.
To rename existing accounts, go to:
Setup > Accounting > Chart of Accounts
Click the Edit link to the left of the accounts listed below and add the numbers and change the names exactly as shown:
Original Name | New Name |
|---|---|
Checking | 1000 Cash |
Accounts Receivable | 1100 Accounts Receivable |
Accounts Payable | 2000 Payables |
Sales | 4000 Revenue from direct contributions |
Manage Accounting Periods
| Info | ||
|---|---|---|
| ||
|
This section describes how to set up Accounting Periods. To set up Accounting Periods, go to:
Setup > Accounting > ManageAccounting Periods
- Click the Set Up Full Year button
- Choose your organization’s first fiscal month from the First Fiscal Month dropdown
- Enter a four-digit year in the Fiscal Year End field (ie., 2015)
- Choose the period format
- Choose the Year In Period Name
- This determines how the fiscal year is described when it starts in one calendar year and ends in another. For example, if a fiscal year starts in 2009 and ends in 2010, then selecting Ending Year of Period would use 2010 as the name of the period.
- This determines how the fiscal year is described when it starts in one calendar year and ends in another. For example, if a fiscal year starts in 2009 and ends in 2010, then selecting Ending Year of Period would use 2010 as the name of the period.
Migrating Data from QuickBooks
| Info | ||
|---|---|---|
| ||
The most critical part of the migration from QuickBooks to NetSuite is the transfer of data, including Customers, Vendors, the Chart of Accounts and Items.
We will provide instructions to export data from QuickBooks, prepare it with Microsoft Excel and import it into NetSuite. When completed, the following will be available in NetSuite:
- The Chart of Accounts, which consists of parent accounts and no more than one sub-account
- The Customer and Vendor files, which will import one address designated as the default for both shipping and billing
- Non-Inventory and Service Items used on transactions, which may include donations, pledges, consulting services and similar.
Exporting the Chart of Accounts
The Chart of Accounts export from QuickBooks will include a list of the accounts with the following detail:
- Number
- Name
- Type
To export the Chart of Accounts from within QuickBooks, start QuickBooks and go to:
- Lists > Chart of Accounts
- Account > Print List > File > Comma Delimited
- Print (you will be prompted to save the file)
- Save as CSV to your computer
Exporting Customers
The Customer file will include the following fields:
|
|
From within QuickBooks, export the Customer record by going to:
Reports > Customers and Receivables > Customer Contact List
- Customize Report
- Check the fields listed above
- Click OK
- Click the Excel button above the report
- Click Create New Worksheet
- Click the Advanced button
- Uncheck the Space between columns checkbox
- Click Export to the default option
- Save as CSV to your computer
Exporting Vendors
The Vendor file will include the following fields:
|
|
From within QuickBooks, export the Vendor record by going to:
Reports > Vendors and Payables > Contact List
- Customize Report
- Check the fields listed above
- Click OK
- Click the Excel button above the report
- Click Create New Worksheet
- Click the Advanced button
- Uncheck the Space between columns checkbox
- Click Export to the default option
- Save as CSV to your computer
Exporting Items
The Item list will include the following fields:
- Name
- Description
- Type
- Account
- Price
Lists > Item List
- Click the Excel button at the bottom of the screen and select Export All Items
- Choose Create a new worksheet
- Click the Export button
- Save as CSV to your computer
Preparing Files to Import
The following section describes how to prepare files that have been exported from QuickBooks so that they can be imported to NetSuite.
Before starting this process, be sure that you have completed renaming the existing Netsuite Accounts. This was done in the Chart of Accounts section of Session 1.
Chart of Accounts
The Chart of Accounts is imported in two files; one that includes the parent accounts and another that include the sub accounts. The parent import uses the UCOA COA Import file provided by NetSuite.org. Your accounts will be imported as sub-accounts to the UCOA parents. To prepare your accounts in the UCOA format, do the following:
- Open the template file called COA Child Accounts Template
- This file will contain examples for each of the parent accounts we will import later. The parent accounts are listed in the Subaccount Of column. This exact field format ([netsuite parent account number][space][netsuite parent account name]) should be followed for each of the rows that you add.
- Insert rows below each of the parent accounts to accommodate your accounts
- Enter the Number and Name for each sub-account. Ensure the blank fields for Subaccounts of, Type and Currency include the appropriate information.
- When completed, all of your sub-accounts should be included in the file, associated with the appropriate parent, type and currency.
NOTE: NetSuite.org highly recommends integrating your existing chart of accounts in the UCOA structure as described above. If you prefer to integrate your existing chart of accounts as is, please see Appendix
Customers and Vendors
As with the exported Chart of Accounts, the Customer and Vendor export will include empty columns that you will need to remove, and other columns that you will need to clean up. Fortunately, these files typically do not require the multiple steps for cleanup or import that the Chart of Accounts requires. For more information regarding Customer and Vendor data types and object relationships, please review Session 3.
In the Customer and Vendor exports, look for potential issues with the exported data including:
- Emails in the Website column
- Websites in the Email column
- Alpha characters in the Phone field
- Terms that were not added to the Setup > Accounting > Accounting Lists > Terms
To make updates easier to apply later, do the following:
- Add a column called External ID
- In the first External ID field, enter a number or combination of letters and numbers as preferred.
- EXAMPLE: QB1
- Choose the field that contains the value you entered and all of the empty fields below it that have data next to them
- Click the Fill dropdown in the Editing panel of Excel
- Choose Series
- Choose Autofill
- Save the CSV
OPTIONAL
Customers and Vendors can be imported as either Company or Individual types. To indicate the type of entity you are importing, add a column titled “Individual” to the imports. If an entity is an Individual, put a T in the field. For all others, put an F in the field to indicate they are company types.
| Info | ||
|---|---|---|
| ||
Items
Items are imported based on the Item type. Item Types included Inventory, Non-inventory, Service and Other. The majority of smaller organizations work with non-inventory or service items. Non-inventory is usually an item or service you sell, but that is not routinely purchased, stocked and resold. Donations might be considered non-inventory. Service items are typically services you offer, such as training or consulting. QuickBooks refers to non-inventory items as “non-inventory part” and services as “service.”
| Info | ||
|---|---|---|
| ||
To prepare the item files for import:
- Remove any empty columns
- Copy the items that are a Service type to a new spreadsheet
- Do a global Search and Replace to remove the word “ part” (including the preceding space) from the non-inventory items
- Remove the dot and trailing space from the values in the Account column
- Ensure there are no $ symbols included in prices or costs
Follow the steps in section 3.5.2 to add an External ID to the import files.
Importing Files
The following section explains how to import the Chart of Accounts into NetSuite. This assumes that you are importing the file you exported and prepared following the steps in the two previous subsections.
Record Types
The following record types will be imported:
- Chart of Accounts
- Customers
- Vendors
- Items
| Info | ||
|---|---|---|
| ||
Handling Import Errors
The process of importing records is often one of trial and error. When importing from QuickBooks, NetSuite expects data to be formatted in a very specific way. For example, while some systems will accept any text in an email field, NetSuite will not; email addresses must fit the exact and proper format for an email address. If a file is imported with improperly formatted email addresses (with spaces or unusual characters), the record will not be imported and an error will occur instead.
There are three places where an error may occur:
- At the file upload screen
- After the field mapping is finished
- When the import is complete.
NetSuite only accepts text files such as a CSV. If you attempt to upload a file such as a native Excel file, the following error will occur:

If you successfully upload a file and complete the field mapping and NetSuite detects a value in a field that is not compatible with the system, an error like this one will appear:
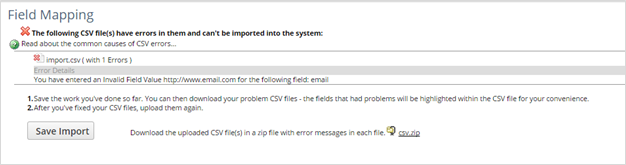
If you see this error, you may save the Field Mapping you created by clicking the Save Import button and then return later to attempt the import again. The Saved Import will be available at:
Setup > Import/Export > Saved CSV Imports
You may also download a zip file with some error detail using the “Download the upload…” csv.zip link.
Once your import is completed, you can check the import status at:
Setup > Import/Export > View CSV Import Status
The screen will show your recent import, the percent complete status, a message and link to a CSV Response that will include any detail error messages.

To download the error detail, click the CSV Response link and Save the file when prompted. Open the exported file. The error detail will be in column A. Fix the errors, then save the CSV and try to import it again.

Chart of Accounts: Parent File
To import the Chart of Accounts, go to:
Setup > Import/Export > Import CSV Records
The import and record type dropdowns will already be set to Accounting and Chart of Accounts.
- Click the Select button
- Choose the file to import from your computer and click Open
- Choose the UCOA COA Import template provided by NetSuite.org
- Click Next
- On the Import Options screen, make sure Add is selected and click Next
- The Field Mapping screen will show Your Fields and the name of your file on the left, NetSuite Fields on the right and the “map” in the middle. Before proceeding, the map/screen should appear as follows:
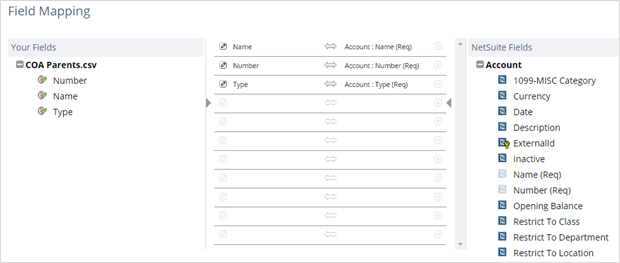
- Click Next
- Enter a name for the import to use as reference if needed later
- Click Save and Run
The screen that appears next is the Confirmation screen, which includes a Refresh button you can use to check the status of the import.
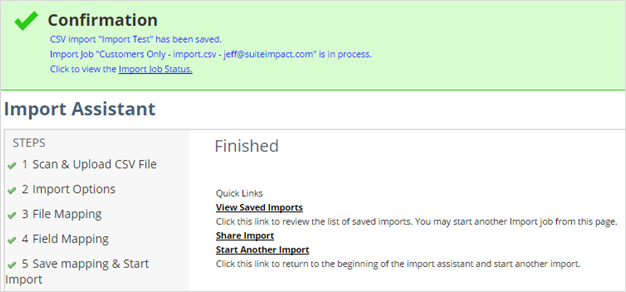
The Chart of Accounts import generally takes less than a minute. If you leave this screen, you may return to check status again later by going to:
Setup > Import/Export > View CSV Import Status.
Chart of Accounts: Sub-accounts
Repeat the process for the sub-account file. Note that the sub-account import will have an additional field called “Subaccount of.”
- Click the Select button
- Choose the file with sub-accounts to import from your computer and click Open
- Click Next
- On the Import Options screen, make sure Add is selected and click Next
- The Field Mapping screen will show Your Fields and the name of your file on the left, NetSuite Fields on the right and the “map” in the middle. For the sub-account import, a field called Subaccount of should be mapped on both sides.
| Info | ||||||
|---|---|---|---|---|---|---|
| ||||||
|