Session 3: Donors/Customers, Vendors, Items and Forms
- Nicola Gabancho (Unlicensed)
- Steve Heye (Unlicensed)
Financials Accelerated Session 3
![]() In this session, you will learn how to and access screen and print forms, ensuring you are comfortable with entering data useful in reports and customizing your forms to your organization’s unique needs.
In this session, you will learn how to and access screen and print forms, ensuring you are comfortable with entering data useful in reports and customizing your forms to your organization’s unique needs.
Information may be needed from your Executive Sponsor and Bookkeeper for the settings chosen in this session.
NetSuite Record Types
Organizations
In NetSuite, any person or company you receive money (transactions or donations) from is a Customer Organization. An Organization can have Individuals attached to it, as either Sub-Organizations (where you might have transactions) or as Contacts (an individual that does not give/receive monetary transactions). For the purposes of this training, we will refer the NetSuite Customer record for Donors.
Customer records are required in order to create sales transactions such as Sales Orders, Cash Sales and Invoices. Other entity records used to store information about people or businesses you engage with include Contact and Partner records. Contacts can be associated with Customers but only a Customer (including sub-customer) type can be included on a sales transaction.
Any individual or company you give money (payments) to is an Vendor Organization. An organization can be designated as both a Customer and a Vendor where necessary. A person or company can also be a Partner Organization (we won't cover Partner records in this document, but you can learn more in SuiteAnswers on how to use Partner records).
![]() Important: We recommend that you use Individual or Company Organizations rather than Contacts where possible. Contacts do not allow transactions against them, so by setting up people as Customers you allow them to be connected to the company and interact with you as an individual.
Important: We recommend that you use Individual or Company Organizations rather than Contacts where possible. Contacts do not allow transactions against them, so by setting up people as Customers you allow them to be connected to the company and interact with you as an individual.
Organizations - an Example Hierarchy
Jennie and John Smith Foundation (Parent Customer Organization)
J&J Smith New Nonprofit Trust (Customer Organization - Child Customer record)
Michael Jones, Program Manager at J&J Smith New Nonprofit Trust (Child Customer record of type Individual)
Households- an Example Hierarchy
George Cullen Household (Parent Customer Record of type Organization)
George (Individual contributor (Child Customer record of type Individual)
Denise (Individual contributor (Child Customer record of type Individual)
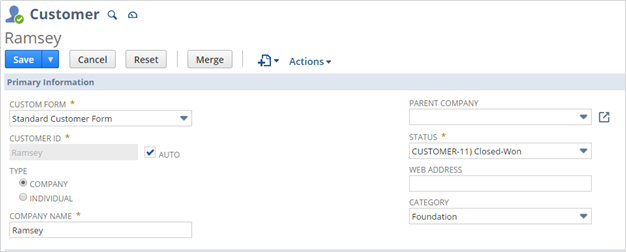
Entering a Customer (or Donor) Record
Customers can be manually added to NetSuite or they can be imported. A previous section describes how to import Customer records. To manually add a Customer record, do the following:
List > Relationships > Customers > New
- Select if the customer is an Individual or Company type
- If Individual, additional fields will appear for the First Name, Middle Initial and Last Name.
- Complete the information on the remaining tabs as desired. It is highly recommended that an address be included. To do so,
- Go to the Address tab
- Click the pencil icon on the far right of the address row
- Complete the Address details and Save
- Other notable settings include:
- Financial > Terms
- Financial > Credit Cards
- Preferences > Send Transactions Via
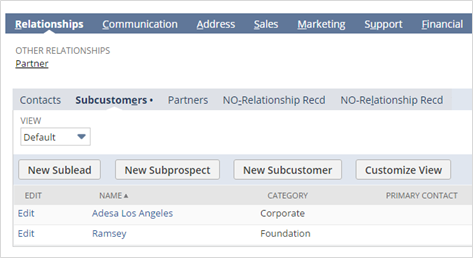
Creating a Sub-Customer
NetSuite allows you to create a parent/child structure for customer records. This offers the option to create a master “household” Customer record and individual sub-customer records for each member of a family, for example. A household record would be standard Customer record as described above. To associate an existing customer record to a parent, creating the parent/child hierarchy:
- Go to the child record
- Click Edit
- Choose the parent company from the Parent Company dropdown
- Click Save
The sub-customer record can now be found on the Relationships tab of the parent Customer record.
Householding
The customer and sub-customer records can be either Individual or Company types, however, NetSuite recommends saving the household as a Company type and the individuals as Individual types. If you group people in households, track any transactional relationships at the Individuals and Organizational level, not at the household level.
Vendors
Vendor records are required in order to create billing transactions such as Vendor Bills. Vendors can be added to NetSuite manually or via import.
Entering Vendors
To manually add a Vendor record, go to:
List > Relationships > Vendors > New
- Select whether the Vendor is an Individual or a Company
- If Individual, additional fields will be provided for the First Name, Middle Initial and Last Name.
- Complete the information on the remaining tabs as desired. We highly recommend including an address. To do so:
- Go to the Address tab
- Click the little pencil icon on the far right of the screen
- Complete the address details and Save
- Other notable settings include:
- Financial > Terms
- Financial > Tax ID
- Financial > 1099 Eligible
- Preferences > Send Transactions Via
Importing Customers and Vendors
These are the steps to import your customers and vendors.
• Always manage Individuals and Organizations separately.
• When importing multiple individuals and Organizations, always separate into two CSV files.
To import Customer and Vendor files, go to:
Setup > Import/Export > Import CSV Records
- From the Import Type dropdown, choose Relationships
- From the Record Type dropdown, choose Customers Only or Vendors
- Click the Select button
- Choose the file from your computer and click Open
- Click Next
- Ensure the Import Options is set to Add
- Click Next
On the field mapping screen, Your Fields and file are shown on the left, the NetSuite fields are shown on the right and the mapping is shown in the middle.
The right side will contain two important sections. The first is shown already expanded from the top and is labeled Customer. Scroll down the NetSuite fields and expand (click the + symbol) the section called Customer Address, then the Customer Address 1 section.
From the Customer Address 1 section, do the following:
- Click the Address 1 box
- Click OK to the prompt regarding the required fields.
- The Country field will be added automatically
Map the following fields:
| External ID Individual Company Main Email Alt. Email Mr./Ms./… First Name Last Name Main Phone Ship to Street 1 Ship to Street 2 Ship to City Ship to State Ship to Zip Shipping Attention Shipping Addressee Ship To Country Terms | = = = = = = = = = = = = = = = = = = | External ID Individual Company Alt. Email Mr./Ms./… First Name Last Name Phone Customer Address 1: Address 1 Customer Address 1: Address 2 Customer Address 1: City Customer Address 1: State Customer Address 1: Zip Customer Address 1: Attention Customer Address 1: Addressee Customer Address 1: Country (Req) Terms |
|---|
- Click Next
If an error occurs, make a note of the detail provided, which indicates the fields, field types and type of data causing the error. Save the import to access later.
Once you’ve updated file to remove or change the data causing the errors, return to the saved import by going to:
Setup > Import/Export > Saved CSV Imports
Follow the process and continue to troubleshoot data until you are able to click through to the screen with the Save and Run button.
- Click Save and Run
- Click OK to write over the existing Saved Import.
Items
Items are required to process sales transactions of any kind. Even if your organization doesn’t offer items for sale, you will still need to create Items in NetSuite to record income.
Items can be imported or added manually. There are several different types of items. The two common item types used by small organizations are “non-inventory” and “service.” Non-inventory refers to something you sell but do keep track of. Services are typically billable time or another service type.
Items are required to process sales transactions of any kind. Even if your organization doesn’t offer items for sale, you will still need to create Items in NetSuite to record income. These are not “items” for inventory purposes. In NetSuite, line items on revenue transactions require items or services for sale (or resale) to provide financial information such as revenue account and tax information. Similarly, items or services for purchase (or resale) are used on purchase and expense transactions. The term item is also used to represent discounts, miscellaneous charges and other charges.
Define Revenue and Expense Item Strategy
The organization’s leadership team should define the item strategy. In NetSuite, items contain the default general ledger accounts and Department, Class and Location information for sales and purchase transactions.
- For nonprofits, revenue items are represented as either Non-Inventory or Service Items for Sale and entered on Sales transactions. Items provide the natural accounts and native NetSuite segmentation (Department, Class, Location) which determine how Donations, Grants, Programs and other revenue generating transactions are posted to the general ledger for reporting and analysis. For periodic billing, default Billing Schedules can be set on the item in order to automatically generate invoices for a set schedule (monthly, quarterly, etc.)
- For expenses, items created as non-inventory items for purchase enable tracking of organizational spending by item/expense. In addition to maintaining the expense account on the item, items for purchase can also maintain deferral accounts, amortization templates and default native NetSuite segmentation (Department, Class, Location). Items for purchase can be set to be received and accrued if required.
- It is recommended to create at least one item corresponding to each Income account from the Chart of Accounts that will be used on revenue transactions.
- Expense accounts and/or items can be specified on purchasing and expense transactions; therefore, non-inventory items for purchase are not required for each expense account.
- Items will be required for expenses with quantities and receipts.
- Items provide reporting functionality beyond the general ledger, enabling the nonprofit organization to see details of the type of revenue and expenses.
| Item Type | Sample Items |
Non-inventory Item for Sale | Donation Items, Direct Contributions, Government and Non-Government Grants, Event Tickets |
Non-inventory Item for Purchase | Non-Saleable Products for use in office (ex. Supplies, Postage, Materials etc.) |
Services for Sale | Government Services, Membership Dues, In kind Contributions, Program Services |
Inventory Items | Ball Caps, T-Shirts, Jackets, Backpacks |
Other Charge | Miscellaneous Charges that do not fall into other categories |
NetSuite recommends the following structure for items (but modify to match your needs and structure):
- Gifts (parent category)
- Donations (sub-category)
- Annual Campaign (item used on transactions)
- Matching Gift
- Online Donation
- Regular Donation
- Grants
- In Kind
- Major Gifts
- Pledges
- Planned Gift
- Regular Pledge
- Recurring Donation
- Donations (sub-category)
- Earned Income
- Product Sales
- Consulting Sales
- Program Fees
- Gifts (parent category)
Manual Entry
To add an item manually, go to:
Lists > Accounting > Item > New
Note: In most cases, you will use either a non-inventory item or a service. To learn about the differences, please search the NetSuite Help for “Creating Item Records.”
To create the Gifts category item:
Lists > Accounting > Items > New
- Choose Non-Inventory Item for Sale
- Enter Gifts Item name/number
- Enter Gifts in the Display Name field
- Save
To create the Donations sub-category item:
Lists > Accounting > Items > New
- Choose Non-Inventory Item for Sale
- Enter Donations Item name/number
- Enter Donations in the Display Name field
- Choose Gifts from the Subitem Of dropdown
- Save
To create the Annual Campaign item, go to:
Lists > Accounting > Items > New
- Choose Non-Inventory Item for Sale
- Enter Annual Campaign Item name/number
- Enter Annual Campaign in the Display Name field
- Choose Gifts : Donations from the Subitem Of dropdown
- If associated with an Department, Class or Location, choose the appropriate values
Note that these values can be changed on each transaction for each item- Sales/Pricing Tab > Sales Price
- Enter a Sales Price or leave blank to complete on each transaction
- Accounting Tab > Income Account
- Enter the account to which the income will be recorded
- NOTE: if the account is not available yet, you may return to this item and add it later.
- Enter the account to which the income will be recorded
- Preferences Tab
- Uncheck the Can Be Fulfilled box. When this box is checked, an additional “fulfillment” step is required in the sales process. This box is checked by default on Inventory and Non-Inventory items.
- Sales/Pricing Tab > Sales Price
Import
Items must be imported by type, and each type must be imported separately. The following example demonstrates how to import non-inventory items:
To import items, go to:
Setup > Import/Export > CSV Imports
- From the Import Type dropdown, choose Items
- From the Record Type dropdown, choose Non-Inventory Item for Sale
- Click Select and choose the Import file
- Click Next
- On the Import Options screen, ensure Add is selected and click Next
- Map the fields per the table below
- NOTE: the Price fields are located at Item Pricing > Item Pricing 1 from the NetSuite field section on the right (scroll down).
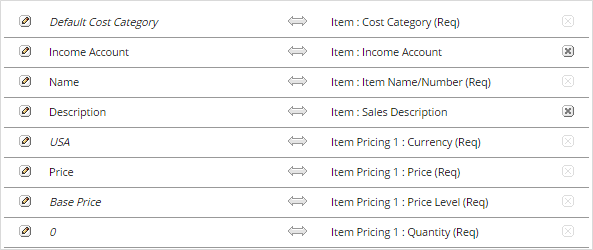
- When you add the NetSuite Price field, an alert will indicate that additional fields are required, and they will be added to the field map. These fields are:
- Currency
- Price Level
- Quantity
- On the Currency row, click the pencil icon to the left of the left column and select USA
- On the Price Level row, click the pencil icon to the left of the left column and select Base Price
- On the Quantity row, click the pencil icon to the left of the left column and enter “0”
- Map the Price field from your import to the Price (Req) NetSuite field
- Click Next
- Enter a name for the import, then click Save and Run
On the following field, click the Import Status link to see the status and results.
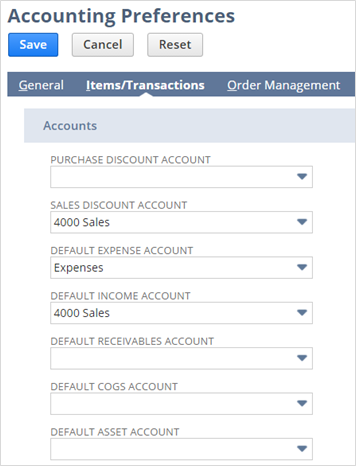
Set Transaction Defaults
In Session 1, we had the opportunity to set the default accounts for transactions. Since the Chart of Accounts had not been imported, we were unable to define them. Now that it is configured, set your Transaction Defaults by going to:
Setup > Accounting > Accounting Preferences
Once you’re on the Accounting Preferences page, click the Items/Transactions tab on the Accounting Preferences menu. Choose your default Expense, Income and other accounts as needed.
Forms
This section describes the NetSuite screen and print forms, the relationship between them, and modifying, renaming and activating them.
Form Types
There are two primary form types in NetSuite; data entry or “screen” forms, and print forms. Each type of form is separate and customized separately.
NetSuite forms are further separated by the type of data that is entered. Forms used to enter customers, vendors, contacts and partners are called Entry forms. Forms used to enter bills, cash sales and sales orders are called Transaction forms. The following is a complete list of Entry and Transaction record types:
Entry Forms
|
|
|---|
Transaction Forms
|
|
|---|
NetSuite Standard Forms
When first provisioned, NetSuite provides a set of default or Standard forms for all basic Entity and Transaction types. These default forms cannot be changed, however, copies can be made and customized to suit individual needs.
Customer and Vendor Forms
Customer and Vendor form are referred to as Entry Forms in NetSuite. In most instances, you will create a customized Vendor or Customer form to add details that are specific to your organization and the types of data you collect.
The standard NetSuite Customer form is used when creating a new Customer record in a new NetSuite account. To see the form, go to:
Lists > Relationships > Customers > New
Customizing Transaction Forms
In order to track and report income by Grant, Fund and Activity, you must customize the Bill and Sale forms. The following describes the specific steps required for each.
Bill Form
To customize the Bill Form, go to:
Customization > Forms > Transaction Forms
- Click Customize next to the Standard Vendor Bill
- In the Name field replace “Custom” with an abbreviation of your organization’s name
- Ensure the “Form Is Preferred” checkbox is checked
- Click the Screen Fields tab
- Click the Items tab
- Click Save
- On the Custom Transaction Forms screen, check the Inactive checkbox next to the Standard Vendor Bill form and then click Submit
- If the Inactive box is not available, check the Show Inactives box above the Edit column
Standard Sales Order, Standard Cash Order, Standard Invoice
To customize the Standard Sales Order, Standard Sales Order - Cash Sale and Standard Professional Invoice forms, go to:
Customization > Forms > Transaction Forms
- Click Customize next to the Standard Sales Order (and repeat for the other forms)
- In the Name field replace “Custom” with an abbreviation of your organization’s name
- Ensure the Form Is Preferred checkbox is checked
- Click the Screen Fields tab
- Click the Columns subtab
- Unless your organization sells and fulfills inventory, uncheck the following, if shown:
- Committed
- Back Ordered
- Units
- Serial Numbers
- Revenue Recognition Schedule
- Revenue Recognition Start Date
- Revenue Recognition End Date
- Tax Code
- Commit
- Order Priority
- Exclude From Rate Request
- On the same tab, check the following boxes:
- Department
- Class (if used)
- Location
- Project (if used)
- Restriction
- Fund\Program
- Revenue Type
- Revenue Subtype
- Grant
- Time Restriction
- Save
- On the Custom Transaction Forms screen, check the Inactive checkbox next to the Standard Sales Order form and the others as you complete them and then click Submit
- If the Inactive box is not available, check the Show Inactives box above the Edit column
Customizing Print and HTML Forms
Each Entry or Transaction form has a corresponding print form. Print forms come in two versions: PDF and HTML. This tutorial describes how to use a basic PDF print form.
The two most common forms to print are Transaction forms and Checks. The following section describes the basic elements and processes involved in modifying the print version of a Cash Sale (a “receipt”) and a Check.
Sales Receipt
The print versions of all Entry, Transaction and other forms are identified on the Entry or Transaction form itself. In this example, we’ll use the Cash Sale form you created above. If you did not create a custom Cash Sale form, you can use the Standard Cash Sale form for reference. Go to:
Customization > Forms > Transaction Forms
- Click Customize next to the Cash Sale form you customized earlier
- The first dropdown listed under the Name and Form Type is “PDF Layout.”
- The default PDF Layout form is Standard Transaction Layout
- Click the Printing Fields tab
- There are four subtabs here. This is where the fields on printed forms are enabled or disabled. The subtabs are:
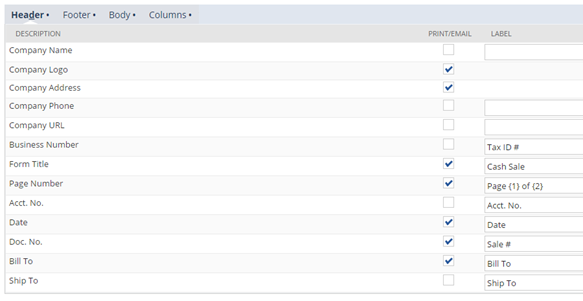
Header: This is the area of the form that primarily controls the company name and logo. It also allows you to determine whether or not the fields are included on the printed form. The Label column is used to change the name of the field on the printed form.
Footer: Works the same way as the Header tab, but controls the fields in the Footer
Body: This section controls the fields displayed above the transaction columns (other than the fields in the Header) and controls whether the fields are shown and the width of the field.
Column: This refers to the columns that make up the transaction detail. Controls whether the columns are included, how they’re named and their width.
- In the Header subtab:
- Uncheck Company Logo
- Check Company Name
- In the Footer subtab:
- Uncheck the Bar Code box, if shown
- In the Body subtab:
- Uncheck Start Date
- Uncheck End Date
- Uncheck Credit Card Number
- Uncheck Project
- In the Columns subtab:
- If shown, uncheck Units
- If shown, uncheck Serial Number
- If shown, uncheck Options
- Click Save
To modify the PDF print form, go to:
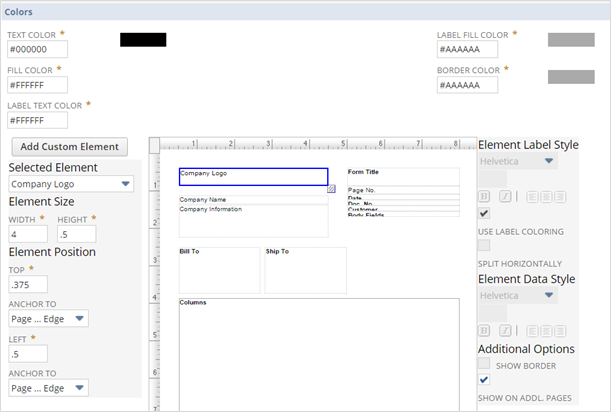
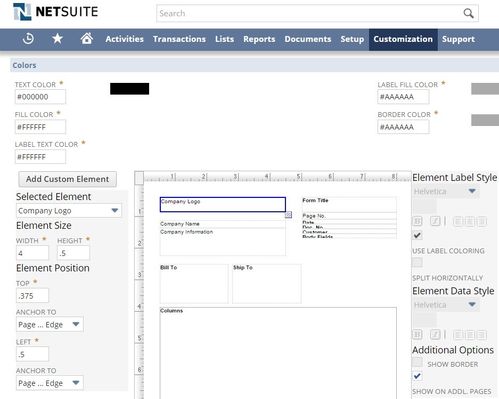
Customization > Forms > Transaction Form PDF Layouts
The screen capture below shows the form and field layout. Each of the elements can be moved and resized, but they cannot be removed. Fields are shown or hidden using the Printing Fields tab on the Screen version of the form as described above.
Fields on the PDF form can be resized by grabbing the resize box in the lower right corner and dragging. You can reposition the box itself by grabbing anywhere in the box area and dragging, or using absolute size or positioning under the Element Size or Element Position sections. You can modify the typeface, color and other attributes of Text fields by selecting the field and changing the values in the Element Label or Element Data Style sections.
- Click Customize next to Standard Transaction Layout
- Change the word “Custom” to your organization’s name or an abbreviation, consistent with other forms.
- Click the Preview button on the form (not shown here) to see a generic preview (without data) of this form.
- Save
Check
To modify the standard NetSuite check form, go to:
Customization > Forms > Transaction Form PDF Layouts
- Click Customize, next to the Standard Check Layout
- Enter a name that is consistent with your other forms
- Note: If you are using Voucher-style checks, you can only modify the check portion itself using the Transaction Form layouts. Changes to the Voucher portion require Advanced PDF Forms (included with your donation).
- If your checks are pre-numbered, do the following:
- Click the Doc No. field, which is located in the upper right corner of the Check form.
- With the box highlighted (four arrows pointing up/down/left/right), move the box as far to the upper right corner of the form itself as possible
- Use the resize box to make it as small as possible
- The NetSuite-generated check number will not print on the check
- Using a blank sheet of paper, click the Preview button then print the form.
- Lay the preview over your check to compare how the fields line up. Move the fields on the form in the same way you moved the check number field.
Customizing Forms
For more information about customizing Entry, Transaction and other forms, please search NetSuite Help for “Creating Custom Entry and Transaction Forms.”
") Homework: Prior to the next session:
Homework: Prior to the next session:
- Create a Customer and a Sub-Customer
- Migrate data:
- Customers
- Vendors
- Items
- Complete the configuration in this session:
- Enter transaction defaults
- Customize the Bill and Sales forms to add segments
- Customize Print and HTML forms for checks