Session 6: Accounts Receivable, Cash Sales and Budgets
- Nicola Gabancho (Unlicensed)
- Steve Heye (Unlicensed)
Financials Accelerated Session 6
![]() In this session, you will learn to use the Accounts Receivable and billing functions of NetSuite, including entering and billing Orders, receiving Payments and accessing reports, entering a Budget, and importing a Budget. At the end of this session, you should have a solid understanding of the NetSuite Accounts Receivable functions.
In this session, you will learn to use the Accounts Receivable and billing functions of NetSuite, including entering and billing Orders, receiving Payments and accessing reports, entering a Budget, and importing a Budget. At the end of this session, you should have a solid understanding of the NetSuite Accounts Receivable functions.
Information may be needed from your Executive Sponsor and Book Keeper for the configurations in this session.
Entering Sales and Payments
This section describes how to enter Customer transactions (income) and apply Customer payments.
Sales Orders
A Sales Order creates a placeholder for a future cash sale or invoice. For example, a Sales Order can be used to create a donation or a pledge, which can then be converted to a cash transaction once the donation or pledge is made official.
To create a Sales Order, go to:
Transactions > Sales > Enter Sales Orders
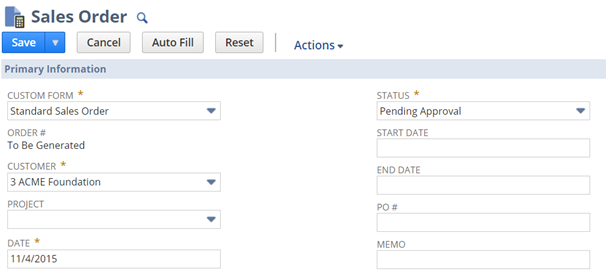
- Enter the Customer or Customer: Grant. If there is no Grant or Project associated with the customer, the Customer name alone may be selected.
- Enter a Transaction Date
- Choose a Status
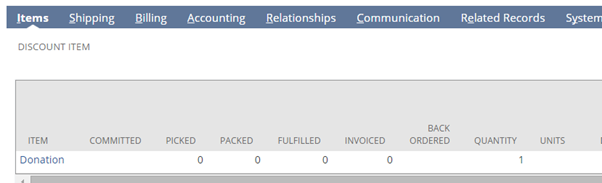
- From the Items tab below, choose an Item from the dropdown
- Enter the quantity, description and price as needed.
- Choose a Class, Department, Location and custom segments
- On the Billing Tab…
- If the Sales Order will be converted to an Invoice, creating a Receivable
or - Choose from the Payment Method dropdown if the Sales Order will be converted to a Cash Sale
- Complete remaining Billing information as available or Save
- If the Sales Order will be converted to an Invoice, creating a Receivable
Billing a Sales Order
To convert a Sales Order to a Cash Sale or Invoice, go to:
Transactions > Sales > Bill Sales Order
- Click the Sales Order that needs to be billed
- Click the Bill Remaining button
- If a Cash Sale is created, go to the Billing Tab and:
- Enter the credit card information or, if a credit card is saved to the Customer record, choose the card from the Credit Card Select field
- Verify the remaining information
- Save
- If an Invoice is created, go to the Billing Tab and:
- Verify the information
- Save
- If a Cash Sale is created, go to the Billing Tab and:
Invoices and Cash Sales
Invoices are transactions with payment terms. They create a Receivable for future payment. Cash Sales assume the payment has already been made. To create an Invoice or Cash Sale, go to:
Transactions > Sales > Create Invoices or Enter Cash Sales
- Enter the Customer or Customer: Grant in the Customer field
- Enter the transaction date
- The Posting Period will auto-fill with the period based on the transaction date.
- Choose the Terms
- These will auto-fill from the Customer record if they are selected on the Financial tab
- On the Items tab, choose the Item to be billed and enter the Quantity, Rate, and values from any or all Segments
- On the Billing tab, choose an address from the Bill To Select dropdown. If no address is available, click New to create one
- Save
Applying Payment to Invoices
When payment for an open Invoice is received, it needs to be applied to the open Invoice. To apply payment to open Invoices, go to:
Transactions > Customers > Accept Customer Payments
- Enter the Customer name
- The Customer’s open transactions will appear in a list under the Apply menu
- Enter an internal reference number (not the check number) in the Payment Number box
- Check the box next to the Invoices to which the payment applies
- If it is a partial payment, enter the amount paid in the box furthest to the right on the Invoice row. The invoice will remain open with a balance.
- On the Payment Method tab, enter the pertinent information
- Save
Accessing Customer-Specific Transactions
You can access all Customer transactions via the Customer record itself. To locate, open and review transactions and other records, open the Customer record and go to:
Sales tab > Transactions
- By default, all transactions are listed. The filters below the Transactions tab provide the ability to restrict to certain transactions or status
- All transactions can be opened from the Customer record
- A summary of Customer activity can be accessed from the Customer Dashboard, accessed by clicking the icon directly above the Customer name, above the Edit, Back and Accept Payment buttons
A/R Reports
Receivables are viewed and managed through a series of standard reports. To view A/R reports, go to:
Reports > Customers/Receivables
- A/R Aging
- Change the reporting date
- Select the Aging Options button to review options
- A/R Register
- Lists all posting sales and payments by customer
- A/R History by Invoice
- A/R History by Payment
Budgets
NetSuite provides a basic budget worksheet that provides the ability to run “Budget versus Actual” reports. It is not a budgeting tool with the ability to enter “what if” scenarios. We will enter a budget manually and you will learn how to prepare and import a budget for your staff via Excel.
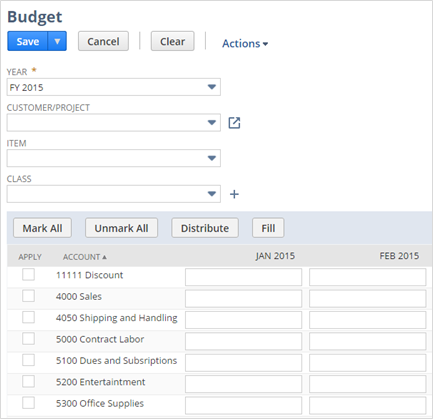
Entering a Budget
Budgets can be imported into NetSuite or added manually via the Budget form. NetSuite.org recommends entering your first Budget manually, rather than attempting to import it. To enter a budget, go to:
Transactions > Financial > Set Up Budgets
- Choose the Fiscal Year
- If associated with a specific Customer/Donor, choose that value from the dropdown
- Choose Segment values if the budget is associated with the specific Segments
- Choose a Department, Class, Location or Custom Segment dimension if desired
- Choose the Account Types to enter
- Enter amounts with the following options:
- Enter actual amounts in each cel based on the budget developed outside of NetSuite
- Enter a total annual amount in the first month. Check the Apply box to the left of the account name, then click the Distribute button to distribute by 12ths
- Enter a single amount that repeats each month in the first month cel, check the Apply box, then click the Fill button to fill the amount through the remaining months.
Transactions > Financial > Set Up Budgets
- Choose the Accounting Period
- Note: if an accounting period is not available, see Session One: Manage Accounting Periods to create one.
- Enter the amounts for each period in the respective account field
- If an account has equal amounts across all periods, the amount can be auto-filled in one of two ways:
- Distribute - enter the total amount for the year in the first period then check the Apply box for the account and click the Distribute button
- Fill - to fill an amount across all periods, enter the amount for that period then check the Apply box for the account and click the Fill button.
Importing a Budget
Budgets can be prepared in Excel and imported into NetSuite. Using the template provided, enter the information as shown below:

To import the budget, ensure that the file is saved as a CSV and go to:
Transactions > Financial > Setup Budgets > Import
- Choose Select
- Choose the file to import
- Ensure the year, Account and Period fields are mapped

- Click Next
- Click Save and Run
Budget Tips:
- • Use Budget Categories to create differentiation between budgets for which other criteria, such as Constituent, Native Segments, and Custom Segments are identical.
- • Use the CSV import functionality in NetSuite to easily import Budgets.
- • Use the Copy Budget to copy your budget from the previous year or use last year’s actuals.
Other Transactions
This section introduces other financial transactions and processes used in day-to-day accounting.
Making Deposits
In NetSuite, payments received by cash or check are held in the Undeposited Funds account on the General Ledger. When a deposit is made at the bank, an equal record of the deposit is made in NetSuite. To record a Deposit, go to:
Transactions > Bank > Make Deposits
- Choose the Account to which the deposit was made
- Enter the deposit Date
- Click the Payments tab and check the box for each of the payments deposited
- Click the Other Deposit tab to add other monies collected and deposited but not recorded in a transaction
- Click the Cash Back tab to record cash that was received during the deposit
- Save
Bank Reconciliations
Each bank account is reconciled against monthly statements. To reconcile a bank account, go to:
Transactions > Bank > Reconcile Bank Statement
- Choose the Account to be reconciled
- Enter the Statement Date
- Enter the Ending Balance on the Statement
- On the Deposits and Credits tab, check the Deposits and Credits
- On the Checks and Payments tab, check the Checks and Payments that cleared
- On the New Charges tab, enter any additional charges on the Statements
- On the New Deposits tab, enter any New Deposits
- To save the Reconciliation and return to it, click the Hold button
- When you return to the Bank Reconciliation screen, the Held Bank Rec will have loaded.
![]() Important: Only one reconciliation can be held at a time. Do not change the account on a held bank reconciliation, or the checkboxes will be cleared.
Important: Only one reconciliation can be held at a time. Do not change the account on a held bank reconciliation, or the checkboxes will be cleared.
- Click Save when the account is reconciled
For more information about the reconciliation process, search NetSuite Help for “Bank Account Reconciliation and Reporting.”
Journal Entries
Journal Entries can be entered manually or through Import in NetSuite. To enter a Journal Entry manually, go to:
Transactions > Financial > Make Journal Entries
- Choose the Date and Posting Period
- Enter a Memo
- Enter the Account, Debits and Credits
- The Name column provides the ability to include Customers, Vendors and Employees
Choose from the Segment values as needed
- The Name column provides the ability to include Customers, Vendors and Employees
To import a Journal Entry, go to:
Transactions > Financial > Make Journal Entries > Import
- From this screen, you can download the Journal Entry Template
- Files must be saved as Comma Separated Values (CSV), not Excel files
- Click the Select button
- Choose the file
- Match the fields
- Run
") Session 6 Homework: Prior to the next session:
Session 6 Homework: Prior to the next session:
- Create a Sales Order
- Bill a Sales Order
- Create an Invoice
- Apply a Payment to an Invoice
- View the A/R Aging report
- Enter or Import a Budget
- Make a Deposit
- Create a Journal Entry