/
Journal Entry Import
Journal Entry Import
- Ces Esparagoza
Owned by Ces Esparagoza
Jun 27, 2014
Step-by-step guide
- Create a CSV File that has the following Columns:
- External ID
- Account
- Debit
- Credit
- Date
- Posting Period
Notes:
- External ID is a unique ID that you have to assign to every transaction. This does not require any format. You can use any combination as long as it is unique and will only be used once.
- For Account, you can just use the Internal ID of the Account instead of the Account Name. To get the Internal ID of the Account, navigate to Lists > Accounting > Accounts > Internal ID column).
Sample CSV file I have used for the import:
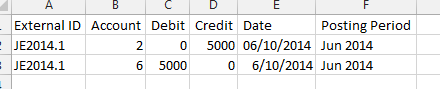
- This will import one Journal Entry. You can add multiple lines on the same CSV File provided that line on the same transaction will have the same External ID. You also need to make sure that Debit Amount and Credit Amount is in Balance.
- Once CSV file is created, in NetSuite navigate to Setup > Import/Export > Import CSV Records.
- Set Import Type = Transactions and Record Type to Journal Entry.
- Select the CSV File then click Next.
- Set Data Handling to Add.
- Field Mapping below:

- Click the Account line.
- Click the Pencil Icon and set Reference Type to Internal ID.
- Click Next.
- Provide Import Map Name.
- Click Save & Run.
Related articles
, multiple selections available,